DIY Halloween Countdown
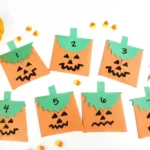
Make a DIY Halloween countdown for kids! This fun, easy activity builds excitement as children count down the days until Halloween.
- Prep Time: 15
- Total Time: 15
- Category: DIY, Halloween
- Method: Step-by-Step
Materials
- Orange construction paper
- Green construction paper
- Scissors
- Glue
- Black marker
- Pencil
- Small candies, notes, or activity ideas
Instructions
- Cut the Orange Circles: Draw a circle on orange construction paper and cut it out. You will need 3 circles per jack-o-lantern.
- Cut out the Green Top: Cut out a circle from green construction paper that is the same size as the orange circles.
- Fold the Circles: Fold all circles in half, creating half-circle shapes. Crease the folds well.
- Build the Pumpkin: Place the first orange half-circle with its folded edge running vertically. Tuck the second half-circle into the first with its folded edge running perpendicular to the other. Glue the overlapping sections together.
- Add the Third Circle: Place the third folded circle opposite the first one. Tuck the bottom half circle into the third section and glue the overlapping pieces together. When opened, the pieces will create an envelope shape.
- Create the Leafy Top: Cut a leafy or jagged pattern along the curved edge of the green half circle to create the pumpkin’s leafy top.
- Attach the Top: Glue the green leafy piece to the back of the top portion of the orange pumpkin. Fold the flap over the front.
- Add the Stem: Cut a small rectangle or stem shape from green construction paper and glue it to the top of the pumpkin.
- Draw a Face: Use a black marker to give your pumpkin a fun Halloween face.
- Make Your Countdown: Repeat the steps until you have as many pumpkins as you need for your countdown. Write a different number on each pumpkin.
- Add the Surprises: Fill each pumpkin with a small piece of candy, a sweet note, a joke, or a fun Halloween activity. Open one pumpkin each day as you count down to Halloween!
Find it online: https://preschoolandplaytime.com/diy-halloween-countdown/